Edit: Most of this info is wrong now. You can find the latest source repository at https://github.com/joshellissh/PiDGC
Edit: Updated 12/9/21 to reflect large changes I have made to the system.
Apologies for the length of this post. If you don’t want to read a lot about computer software and hardware you can skip this one!
About two months ago I started looking into what I was going to do for gauges in my car. I saw various options available, but none I was really excited about. One difficulty I have is that my car is using a modern ECU controlled engine, so that rules out the old gauges right away. I’m left with either retrofit gauges that tie into the ECU, GPS speedometers, etc., none of which I wanted to do. I decide my best bet was a digital gauge cluster. That would tie directly into my ECU, simplify wiring substantially, and provide a lot more functionality than I could get with old-style gauges. I spent a lot of time researching the options on the market and unfortunately I just wasn’t impressed. The only good options are the ones made for racing like the AEM CD-7, but they are a weird form factor and kinda ugly. They also have limited options for what you can make the cluster look like (digitally I mean), and would run be about $2000. I’m not afraid of spending money, but only when it gets me what I want.
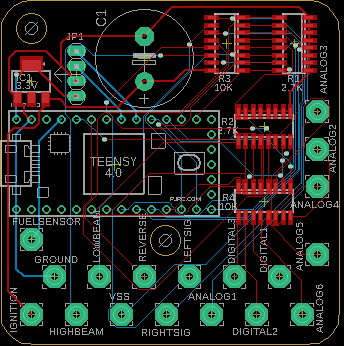
With all that in mind, I started researching what I could do for myself. I’m a Software Engineer by trade and have experience with embedded development (I did avionics at Garmin and traffic control systems before that as well), as well as experience with intermediate Electrical Engineering so I knew it was something I can pull off if I could find the necessary hardware. I quickly decided on a low-cost SoC Raspberry Pi4 with PiCAN3 addon board to communicate with the CANBUS. This will let me pipe the CANBUS messages from the aftermarket ECU I’m running directly into the computer so I can display all the engine data. I needed a way to communicate with the cars analog systems (vehicle speed sensor, various indicators, etc.) which I couldn’t do directly with the RPI, so I settled on designing/making a cheap custom PCB for that. I needed to keep all of this as compact as possible, so I didn’t go with an aftermarket IO board with proper optoisolation. We’ll see how that turns out long-term, but it’s easy to fix and cheap if something happens since I made it modular.
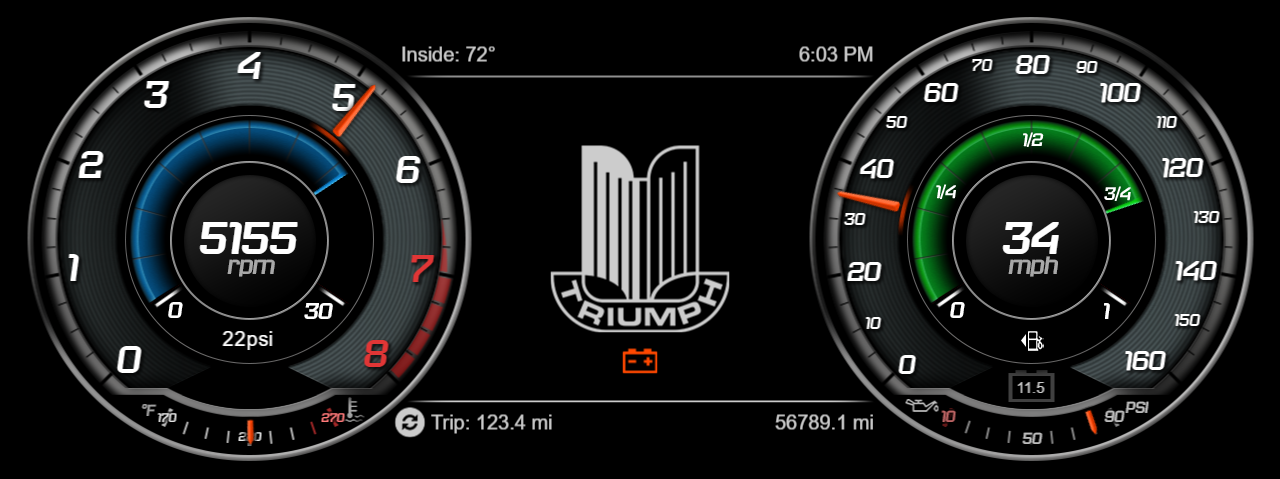
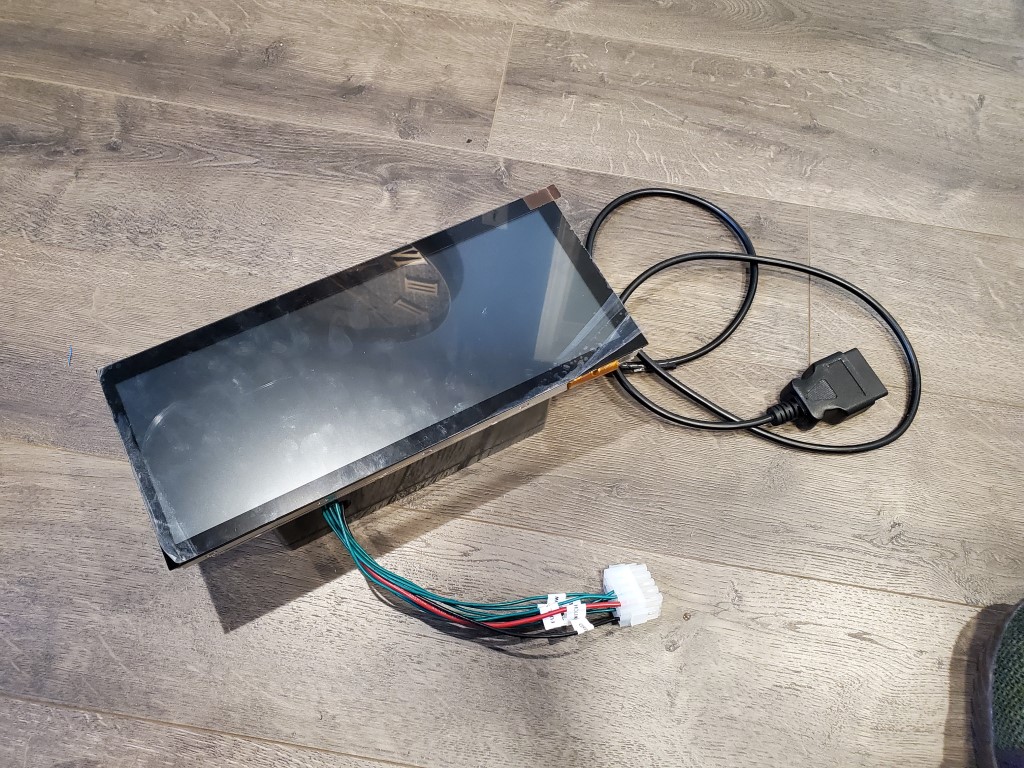
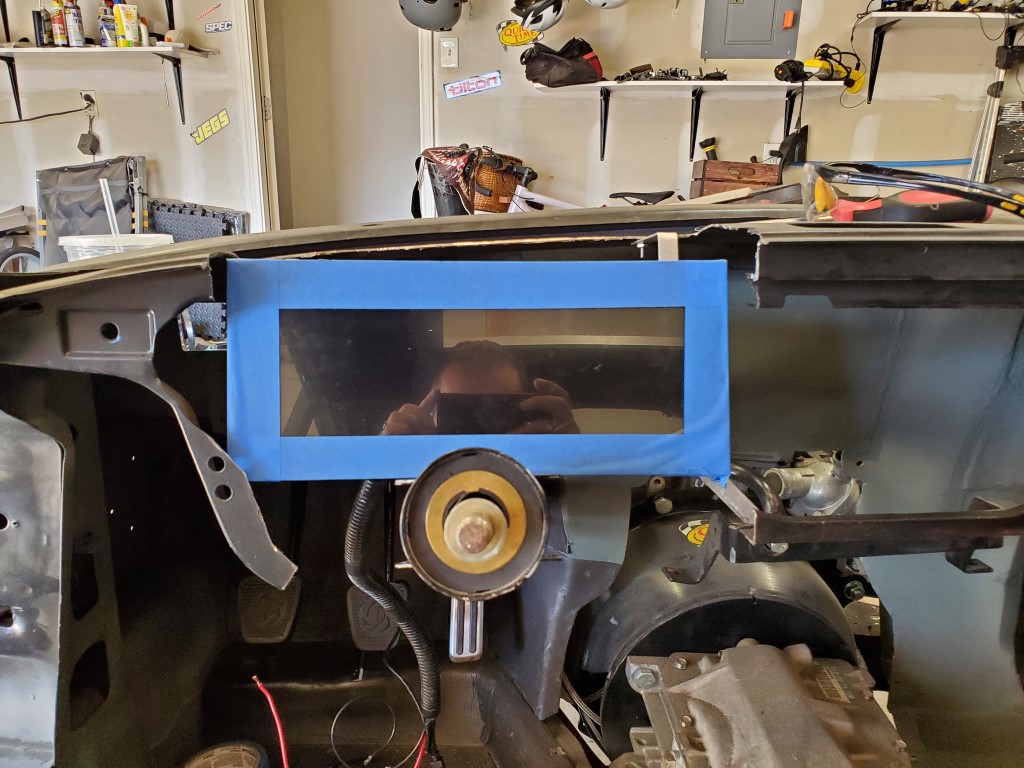
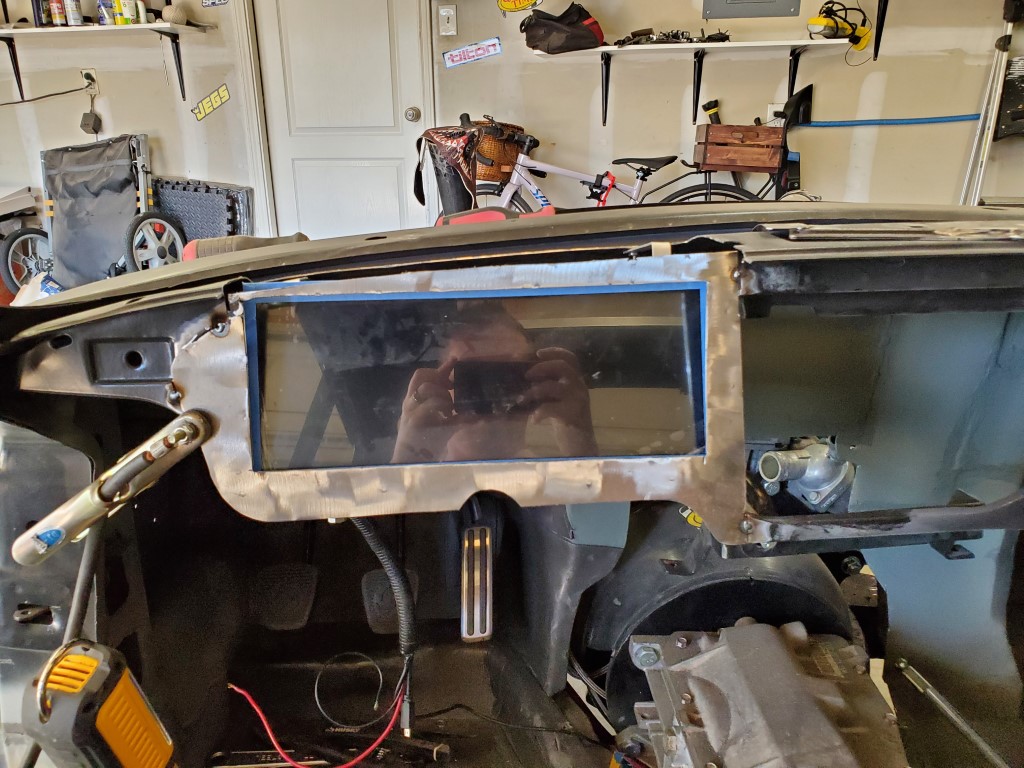
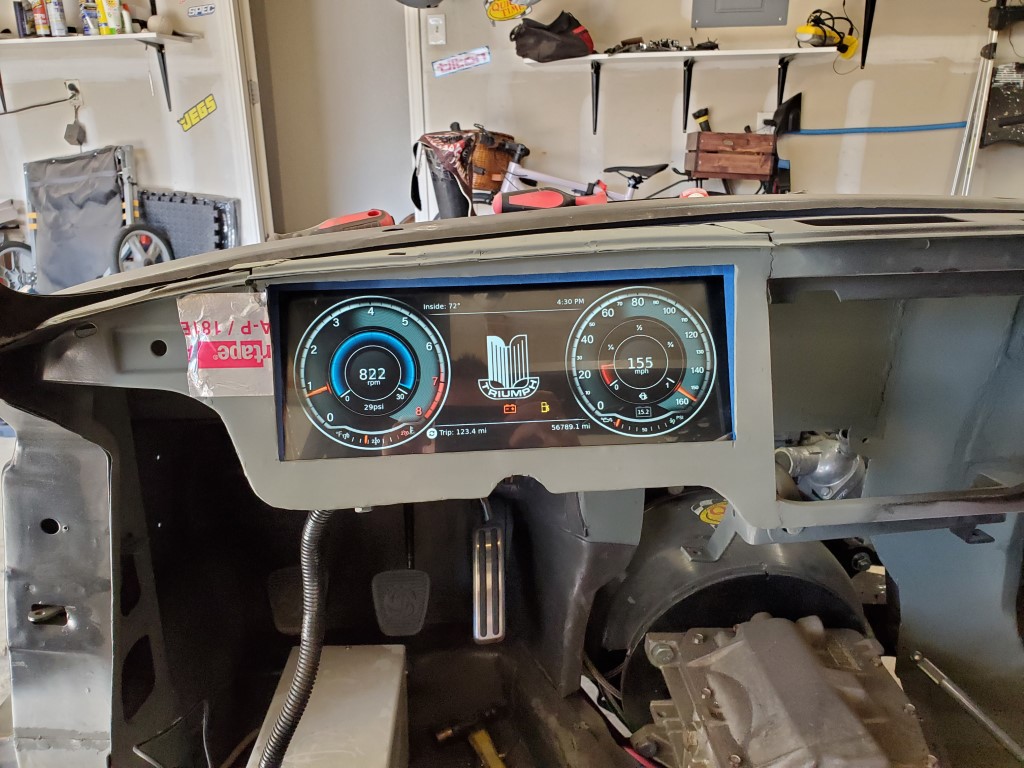
The display was a lot harder to find. I needed something with good brightness/contrast since it’s going in a car, proper temperature rating, very wide ratio, could be interfaced easily via some form of HDMI, and has a touchscreen. Needless to say, this was difficult. I looked at what feels like a thousand LCDs and driver boards on every site I could find before finally finding one on AliExpress. It’s a 12.3″ w/touchscreen and LVDS driver board which runs of micro-HDMI. Perfect.
With a lot of custom work to the RPI4 I am able to get the boot time down to 20 seconds in the cluster, which is fast enough for now. I would really like to get that time down, but I don’t have the Linux expertise to create something like a Yocto build. I wrote the cluster software 100% from scratch. The backend is Kotlin which manages the communication with the Arduino and ECM. The frontend is Qt and handles all of the display. I can also bring in a camera feed when the reverse signal is detected, so I can display a backup camera right on the gauge cluster. The Pi filesystem is converted to read-only, so hard shutdowns aren’t an issue, and the odometer information is stored on the Teensy EEPROM.
The circuit board a very simple design to make it as small as possible. It’s basically a Teensy 4.0 breakout board with 16 channels of voltage dividers to reduce the cars 12-15v down to 0-3.3v which the teensy needs. This should really be optoisolated/etc., but I wanted to make it as small as possible given the lack of space behind the GT6 dash. I don’t expect any issues, but if I run into anything these are all cheap parts that are easy to replace. The firmware for the Teensy is obviously all custom as well and pretty trivial.
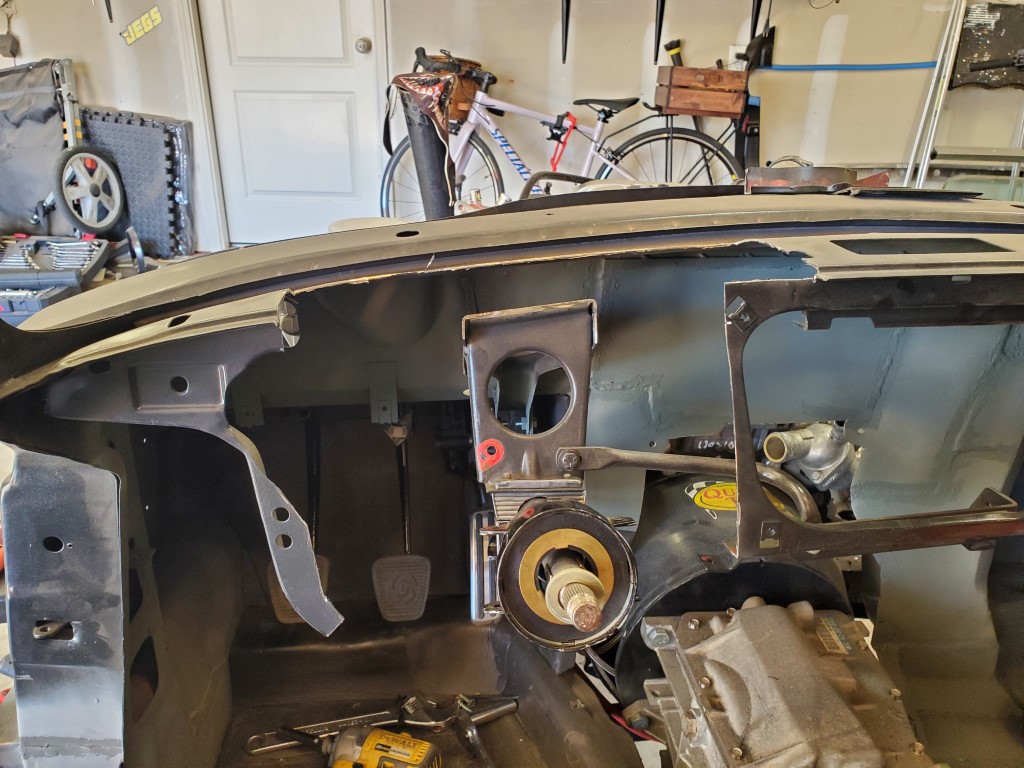
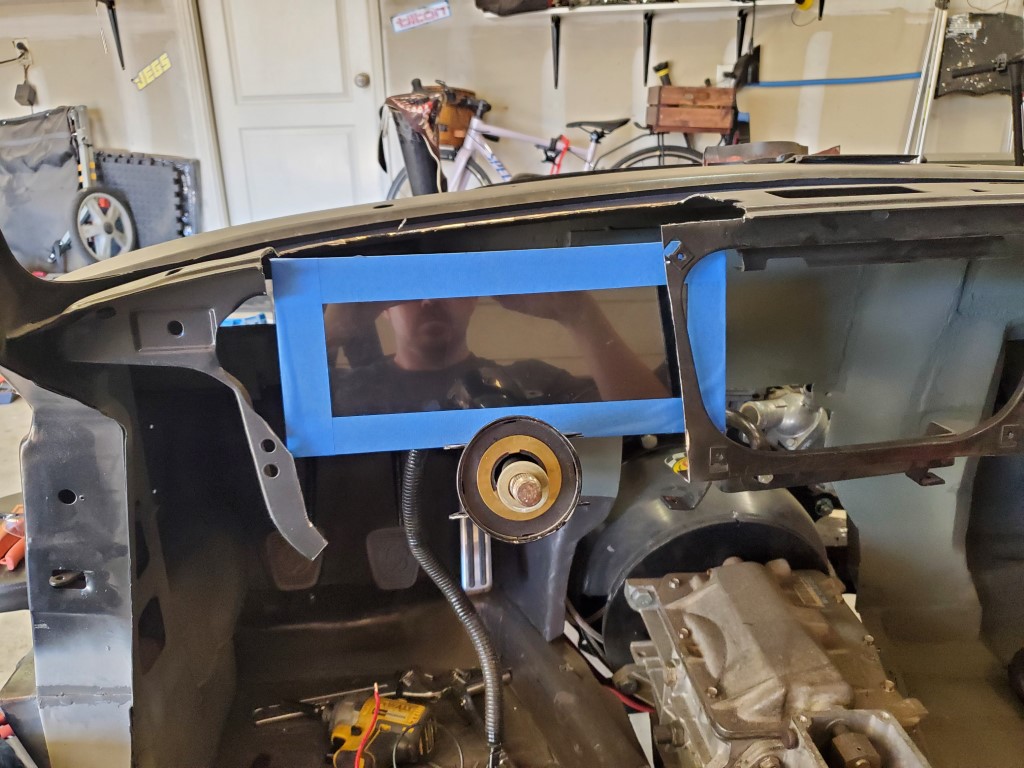
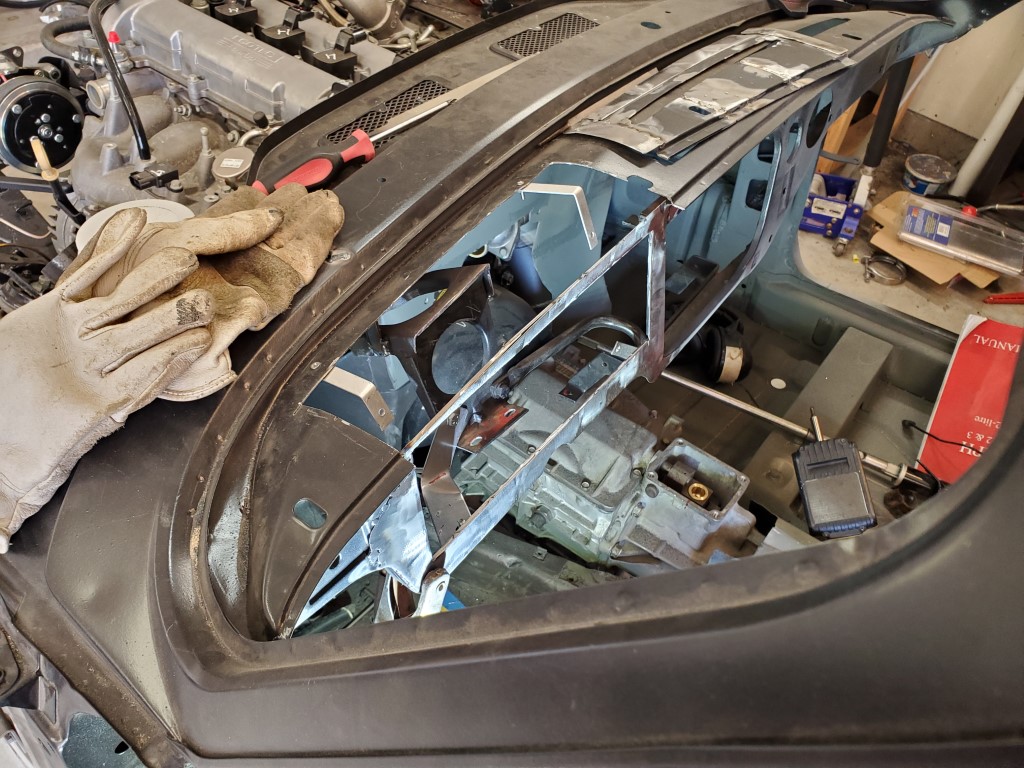
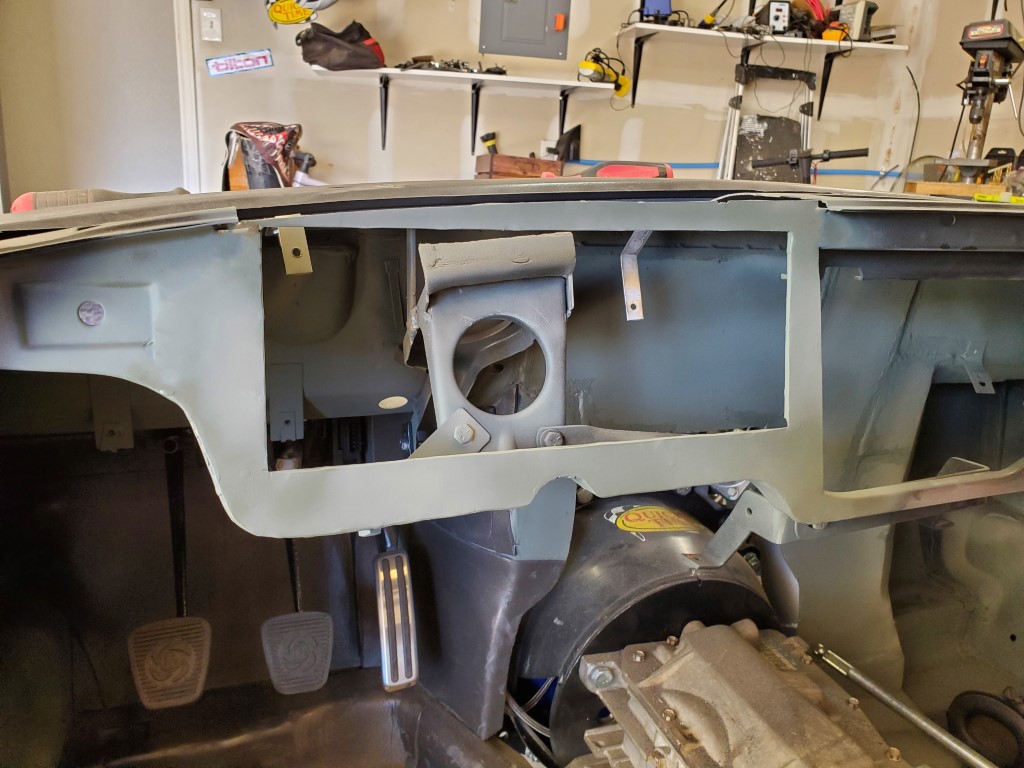
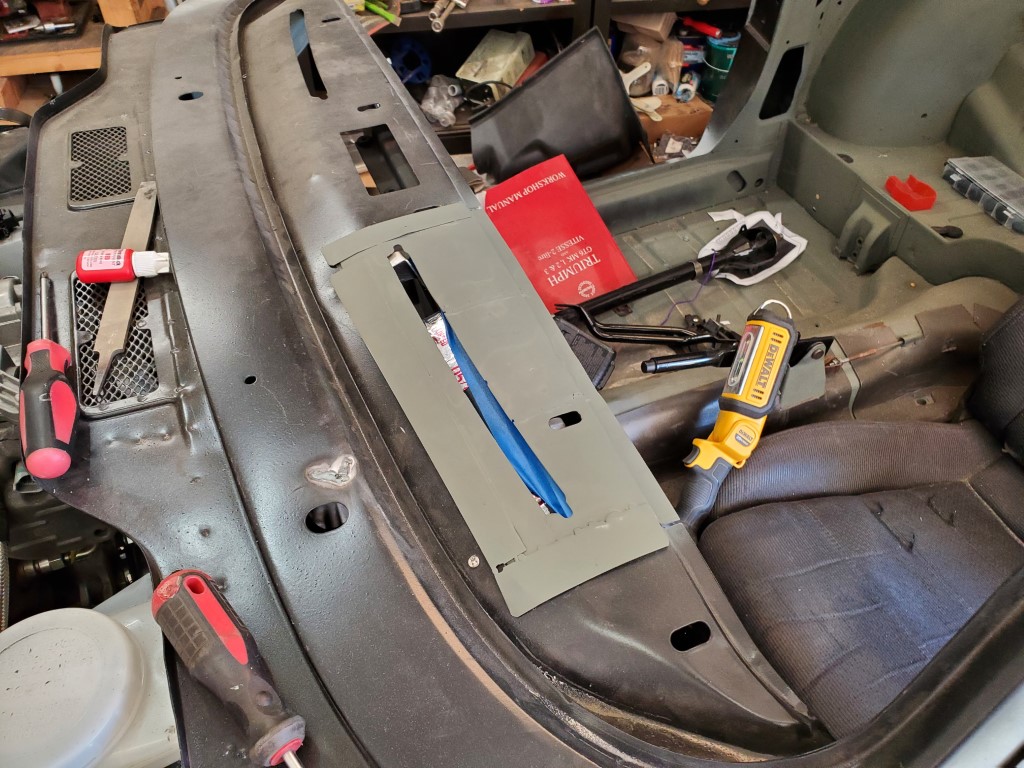
Finally after getting it all assembled into some project boxes I just needed to fit it in the car. I had to do quite a bit of metalwork to the dash to get it to fit. Since I couldn’t fit it in under the dash, I had to create a removable panel on the top of the dash. After that I just needed to cut out all of the front and remake it. The metalwork isn’t the most beautiful, but it will all be behind the custom wood dash face, and the dash top will be foam + leather. It’s strong enough, which is really all that matters here.
I think it’s going to be a really cool, custom system when done. Once the dash face is in and I can make a good shroud to surround the display I am confident it will look like an OEM system (except in a 1972)!
I have published all the source code to the interface firmware and the Raspberry Pi 4 software here on GitHub. It’s very much a work-in-progress and not production ready, so use at your own risk. I have also published the PCB schematics and layout files there.
You can preview what the gauge cluster will look like here. It’s in simulation mode but you get the idea as to what it will look like.
Here are the pictures showing some of the work, and a video showing what the panel looks like in the car. Keep in mind there is a screen protector on the LCD here, which is why there is so much glare/reflection. It should look a lot better when finally installed.


Hey,
that is pretty nice lookin! Questions….
What touchscreen did you buy? Link?
and …
We are doing a digital Dash for RusEfi… Can you come on over and offer some comments/ help?
Thanks, and keep up the nice work!
Hey Bill! Here is the link to the display: https://www.aliexpress.com/item/4000929352535.html?spm=a2g0o.productlist.0.0.275f599bvXPb7H&algo_pvid=2b81d7fa-7094-4289-a7ae-dc752af344ef&algo_expid=2b81d7fa-7094-4289-a7ae-dc752af344ef-5&btsid=0b0a556d16140136011756057e39c8&ws_ab_test=searchweb0_0,searchweb201602_,searchweb201603_
Re: RusEFI, that’s cool! I am not super knowledgeable on the ECU side I’m afraid. Never been a tuner. But if I can offer any assistance on the ODB2/gauge side, let me know.
come on down to the slack channel–
rusefi.slack.com
just send a message there …. and i will put you through…
we have a Digital Dash concept we are trying to get setup for our EFI…
and yours looks super nice…
Hi Josh.
Nice work! I especially like the digital dash you have created.
I was wondering what software you used to create the png graphics and how you created the scales and pointers so they all fit nicely.
Hey Scott,
I did everything in Photoshop. I can’t really say how to make everything fit well, other than a lot of work on it.
anyone was able to replicate this yet? I am not a programmer so i know i will need some assistance. I have already redesign the interface to look like like an 87 Cutlass (im pretty good with photoshop). Still trying to find a screen as the linked page doesn’t work. Once i have that and get a PCB board made set out and printed. I can start working on a bezel design which i will 3d print. I am a systems admin so with a little help from a coder im sure we can get this going. Please reach out to me if you are able to assist [email protected]
I am very interested in how you did this. I dont see the main UI QT code in the source. Any help you can give to get me started.